Introduction
JSON Web Token (JWT) is an open standard (RFC 7519) that defines a compact and self-contained way for securely transmitting information between parties as a JSON object. It has become a cornerstone of modern web authentication and authorization, particularly in the realm of stateless APIs, microservices, and mobile applications. JWTs enable secure and efficient communication by allowing servers to verify the authenticity and integrity of client requests without needing to store any session-specific information on their end.
Understanding the internal workings of JWT authentication is crucial for building robust, secure, and scalable applications. It demystifies how a server can “remember” a user’s authenticated state without traditional session management, how data integrity is ensured, and what security considerations are paramount. This guide will provide a deep technical explanation, walking you through the entire lifecycle of a JWT, from its generation upon user login to its validation during subsequent API requests.
In this guide, you will learn the fundamental architecture behind JWT authentication, the step-by-step process of token creation and verification, the cryptographic principles that secure JWTs, and practical examples to solidify your understanding. We will also explore common pitfalls, performance aspects, and how JWTs compare to alternative authentication mechanisms.
The Problem It Solves
Before the widespread adoption of JWTs, traditional web applications primarily relied on server-side session management, often implemented using cookies. When a user logged in, the server would create a session, store session data (like user ID, roles) on its own memory or a database, and send a session ID in a cookie back to the client. Subsequent requests would include this cookie, allowing the server to look up the session data and identify the user.
This session-based approach introduced several challenges, especially with the rise of distributed systems, microservices architectures, and mobile applications:
- Scalability Issues: Storing session data on a single server creates a bottleneck. Scaling horizontally (adding more servers) requires complex solutions like sticky sessions (directing a user’s requests to the same server) or shared session stores (like Redis), adding overhead and complexity.
- Cross-Domain/Cross-Application Challenges: Cookies are typically tied to a single domain. Authenticating users across multiple distinct services or subdomains becomes cumbersome.
- Mobile Application Incompatibility: Mobile apps don’t inherently use browser cookies, requiring custom mechanisms to manage session IDs.
- CSRF Vulnerabilities: While not exclusive to session cookies, traditional cookie-based authentication is inherently susceptible to Cross-Site Request Forgery (CSRF) attacks if not properly mitigated.
The core problem statement JWTs address is: How can a system securely authenticate and authorize users across multiple, potentially distributed services without requiring the server to store any session-specific state, thereby improving scalability and flexibility? JWTs achieve this by making the authentication token itself “self-contained” and cryptographically verifiable.
High-Level Architecture
JWT authentication involves several key components working in concert. The overall flow ensures that after an initial login, subsequent requests can be authenticated and authorized in a stateless manner.
Component Overview:
- Client (Browser/App): The user interface (web browser, mobile application) that initiates login requests and subsequently sends authenticated requests to access protected resources.
- Authentication Server: The dedicated service responsible for verifying user credentials, and if valid, issuing a JWT. This can be a standalone service or an authentication module within a larger API Gateway.
- User Database: Stores user credentials (e.g., username, hashed password) against which the Authentication Server verifies login attempts.
- API Server (Protected Resource): The service hosting the protected resources. It receives API requests, validates the incoming JWT, and based on the token’s claims, grants or denies access to its resources.
- Application Logic: The business logic within the API Server that handles the actual processing of the request once the user is authenticated and authorized.
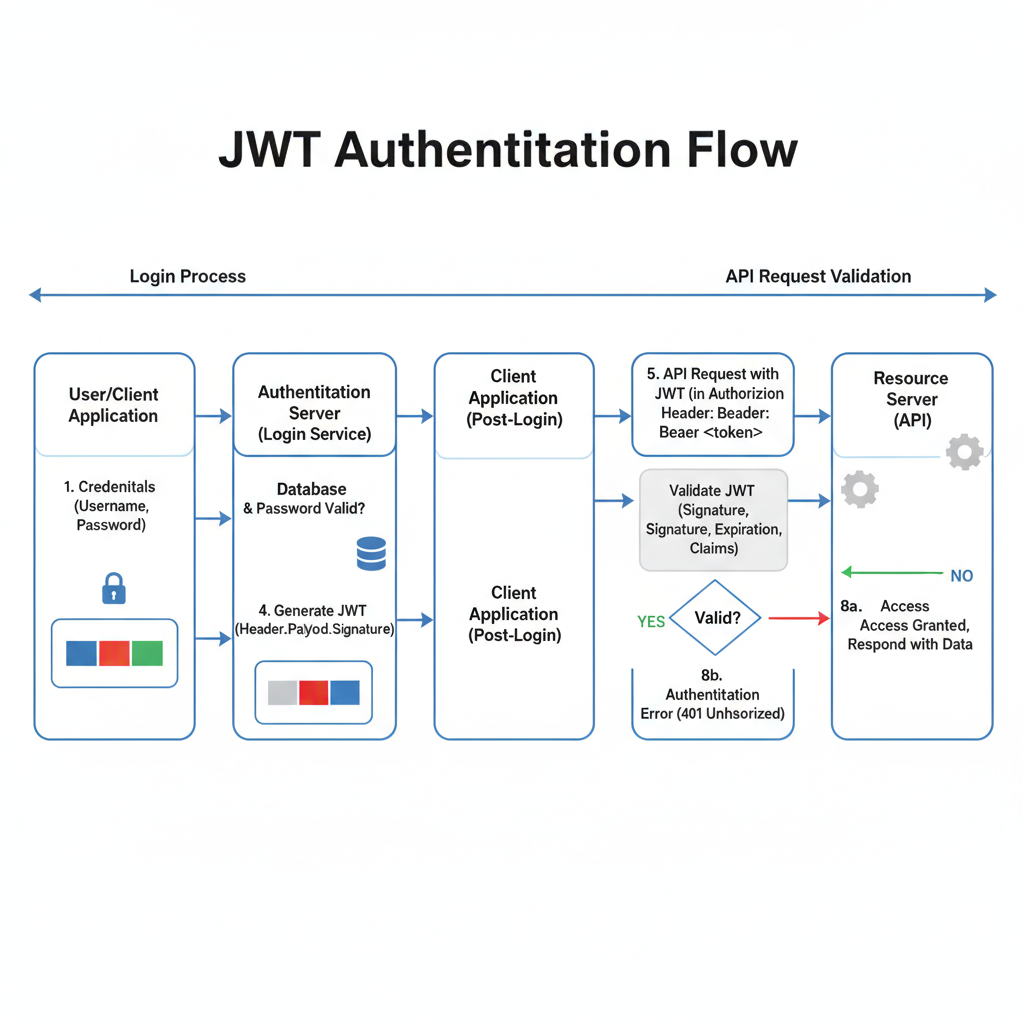
Data Flow:
- The Client sends login credentials (e.g., username and password) to the Authentication Server.
- The Authentication Server queries the User Database to verify these credentials.
- If credentials are valid, the Authentication Server generates a unique JWT.
- The Authentication Server sends this JWT back to the Client in the response.
- The Client stores the JWT (e.g., in local storage, session storage, or an HTTP-only cookie).
- For subsequent requests to protected resources, the Client includes the stored JWT, typically in the
Authorizationheader, when sending requests to the API Server. - The API Server receives the request and, before processing it, extracts and validates the JWT.
- If the JWT is valid, the API Server uses the information (claims) within the token to determine if the user is authorized to access the requested resource.
- The API Server’s Application Logic processes the request.
- The API Server sends the response back to the Client.
This architecture allows the API Server to remain stateless regarding user authentication, as all necessary information for verification and authorization is contained within the JWT itself.
How It Works: Step-by-Step Breakdown
Let’s delve into the detailed process of JWT authentication from the user’s login to accessing protected resources.
Step 1: User Login and Credential Submission
The process begins when a user attempts to log in to an application. The client-side application (e.g., a web browser running JavaScript, a mobile app) collects the user’s credentials, typically a username and password. These credentials are then sent to a designated authentication endpoint on the server.
// Client-side JavaScript example
const username = document.getElementById('username').value;
const password = document.getElementById('password').value;

fetch('/api/login', {
    method: 'POST',
    headers: {
        'Content-Type': 'application/json'
    },
    body: JSON.stringify({ username, password })
})
.then(response => response.json())
.then(data => {
    if (data.token) {
        console.log('Login successful! Token:', data.token);
        // Store the token for future requests
        localStorage.setItem('jwt_token', data.token);
    } else {
        console.error('Login failed:', data.message);
    }
})
.catch(error => console.error('Error during login:', error));
Internally, this involves an HTTP POST request to the server, usually with the credentials in the request body as JSON. It is critical that this communication happens over HTTPS to encrypt the credentials in transit and prevent eavesdropping.
Step 2: Server-Side Credential Verification
Upon receiving the login request, the Authentication Server extracts the username and password. It then queries its user database to verify if a user with the provided username exists and if the provided password matches the stored hashed password for that user. Modern applications always store password hashes (e.g., bcrypt, scrypt) rather than plain text passwords.
// Server-side (Node.js/Express) example - simplified
const bcrypt = require('bcrypt'); // For password hashing
const users = [ // In a real app, this would be a database query
    { id: 1, username: 'testuser', passwordHash: '$2b$10$wN6B0jW2Q8.kFfS6pX2vI.g.g.g.g.g.g.g.g.g.g.g.g.g.g.g.g.g.g.g.g.g.g.g.g.g.g.g.g.g.g.g.g.g.g.g.g.g.g.g.g.g.g.g.g.g.g.g.g.g.g.g.g.g.g.g.g.g.g.g.g.g.g.g.g.g.g.g.g.g.g.g.g.g.g.g.g.g.g.g.g.g.g.g.g.g.g.g.g.g.g.g.g.g.g.g.g.g.g.g.g.g.g.g.g.g.g.g.g.g.g.g.g.g.g.g.g.g.g.g.g.g.g.g.g.g.g.g.g.g.g.g.g.g.g.g.g.g.g.g.g.g.g.g.g.g.g.g.g.g.g.g.g.g.g.g.g.g.g.g.g.g.g.g.g.g.g.g.g.g.g.g.g.g.g.g.g.g.g.g.g.g.g.g.g.g.g.g.g.g.g.g.g.g.g.g.g.g.g.g.g.g.g.g.g.g.g.g.g.g.g.g.g.g.g.g.g.g.g.g.g.g.g.g.g.g.g.g.g.g.g.g.g.g.g.g.g.g.g.g.g.g.g.g.g.g.g.g.g.g.g.g.g.g.g.g.g.g.g.g.g.g.g.g.g.g.g.g.g.g.g.g.g.g.g.g.g.g.g.g.g.g.g.g.g.g.g.g.g.g.g.g.g.g.g.g.g.g.g.g.g.g.g.g.g.g.g.g.g.g.g.g.g.g.g.g.g.g.g.g.g.g.g.g.g.g.g.g.g.g.g.g.g.g.g.g.g.g.g.g.g.g.g.g.g.g.g.g.g.g.g.g.g.g.g.g.g.g.g.g.g.g.g.g.g.g.g.g.g.g.g.g.g.g.g.g.g.g.g.g.g.g.g.g.g.g.g.g.g.g.g.g.g.g.g.g.g.g.g.g.g.g.g.g.g.g.g.g.g.g.g.g.g.g.g.g.g.g.g.g.g.g.g.g.g.g.g.g.g.g.g.g.g.g.g.g.g.g.g.g.g.g.g.g.g.g.g.g.g.g.g.g.g.g.g.g.g.g.g.g.g.g.g.g.g.g.g.g.g.g.g.g.g.g.g.g.g.g.g.g.g.g.g.g.g.g.g.g.g.g.g.g.g.g.g.g.g.g.g.g.g.g.g.g.g.g.g.g.g.g.g.g.g.g.g.g.g.g.g.g.g.g.g.g.g.g.g.g.g.g.g.g.g.g.g.g.g.g.g.g.g.g.g.g.g.g.g.g.g.g.g.g.g.g.g.g.g.g.g.g.g.g.g.g.g.g.g.g.g.g.g.g.g.g.g.g.g.g.g.g.g.g.g.g.g.g.g.g.g.g.g.g.g.g.g.g.g.g.g.g.g.g.g.g.g.g.g.g.g.g.g.g.g.g.g.g.g.g.g.g.g.g.g.g.g.g.g.g.g.g.g.g.g.g.g.g.g.g.g.g.g.g.g.g.g.g.g.g.g.g.g.g.g.g.g.g.g.g.g.g.g.g.g.g.g.g.g.g.g.g.g.g.g.g.g.g.g.g.g.g.g.g.g.g.g.g.g.g.g.g.g.g.g.g.g.g.g.g.g.g.g.g.g.g.g.g.g.g.g.g.g.g.g.g.g.g.g.g.g.g.g.g.g.g.g.g.g.g.g.g.g.g.g.g.g.g.g.g.g.g.g.g.g.g.g.g.g.g.g.g.g.g.g.g.g.g.g.g.g.g.g.g.g.g.g.g.g.g.g.g.g.g.g.g.g.g.g.g.g.g.g.g.g.g.g.g.g.g.g.g.g.g.g.g.g.g.g.g.g.g.g.g.g.g.g.g.g.g.g.g.g.g.g.g.g.g.g.g.g.g.g.g.g.g.g.g.g.g.g.g.g.g.g.g.g.g.g.g.g.g.g.g.g.g.g.g.g.g.g.g.g.g.g.g.g.g.g.g.g.g.g.g.g.g.g.g.g.g.g.g.g.g.g.g.g.g.g.g.g.g.g.g.g.g.g.g.g.g.g.g.g.g.g.g.g.g.g.g.g.g.g.g.g.g.g.g.g.g.g.g.g.g.g.g.g.g.g.g.g.g.g.g.g.g.g.g.g.g.g.g.g.g.g.g.g.g.g.g.g.g.g.g.g.g.g.g.g.g.g.g.g.g.g.g.g.g.g.g.g.g.g.g.g.g.g.g.g.g.g.g.g.g.g.g.g.g.g.g.g.g.g.g.g.g.g.g.g.g.g.g.g.g.g.g.g.g.g.g.g.g.g.g.g.g.g.g.g.g.g.g.g.g.g.g.g.g.g.g.g.g.g.g.g.g.g.g.g.g.g.g.g.g.g.g.g.g.g.g.g.g.g.g.g.g.g.g.g.g.g.g.g.g.g.g.g.g.g.g.g.g.g.g.g.g.g.g.g.g.g.g.g.g.g.g.g.g.g.g.g.g.g.g.g.g.g.g.g.g.g.g.g.g.g.g.g.g.g.g.g.g.g.g.g.g.g.g.g.g.g.g.g.g.g.g.g.g.g.g.g.g.g.g.g.g.g.g.g.g.g.g.g.g.g.g.g.g.g.g.g.g.g.g.g.g.g.g.g.g.g.g.g.g.g.g.g.g.g.g.g.g.g.g.g.g.g.g.g.g.g.g.g.g.g.g.g.g.g.g.g.g.g.g.g.g.g.g.g.g.g.g.g.g.g.g.g.g.g.g.g.g.g.g.g.g.g.g.g.g.g.g.g.g.g.g.g.g.g.g.g.g.g.g.g.g.g.g.g.g.g.g.g.g.g.g.g.g.g.g.g.g.g.g.g.g.g.g.g.g.g.g.g.g.g.g.g.g.g.g.g.g.g.g.g.g.g.g.g.g.g.g.g.g.g.g.g.g.g.g.g.g.g.g.g.g.g.g.g.g.g.g.g.g.g.g.g.g.g.g.g.g.g.g.g.g.g.g.g.g.g.g.g.g.g.g.g.g.g.g.g.g.g.g.g.g.g.g.g.g.g.g.g.g.g.g.g.g.g.g.g.g.g.g.g.g.g.g.g.g.g.g.g.g.g.g.g.g.g.g.g.g.g.g.g.g.g.g.g.g.g.g.g.g.g.g.g.g.g.g.g.g.g.g.g.g.g.g.g.g.g.g.g.g.g.g.g.g.g.g.g.g.g.g.g.g.g.g.g.g.g.g.g.g.g.g.g.g.g.g.g.g.g.g.g.g.g.g.g.g.g.g.g.g.g.g.g.g.g.g.g.g.g.g.g.g.g.g.g.g.g.g.g.g.g.g.g.g.g.g.g.g.g.g.g.g.g.g.g.g.g.g.g.g.g.g.g.g.g.g.g.g.g.g.g.g.g.g.g.g.g.g.g.g.g.g.g.g.g.g.g.g.g.g.g.g.g.g.g.g.g.g.g.g.g.g.g.g.g.g.g.g.g.g.g.g.g.g.g.g.g.g.g.g.g.g.g.g.g.g.g.g.g.g.g.g.g.g.g.g.g.g.g.g.g.g.g.g.g.g.g.g.g.g.g.g.g.g.g.g.g.g.g.g.g.g.g.g.g.g.g.g.g.g.g.g.g.g.g.g.g.g.g.g.g.g.g.g.g.g.g.g.g.g.g.g.g.g.g.g.g.g.g.g.g.g.g.g.g.g.g.g.g.g.g.g.g.g.g.g.g.g.g.g.g.g.g.g.g.g.g.g.g.g.g.g.g.g.g.g.g.g.g.g.g.g.g.g.g.g.g.g.g.g.g.g.g.g.g.g.g.g.g.g.g.g.g.g.g.g.g.g.g.g.g.g.g.g.g.g.g.g.g.g.g.g.g.g.g.g.g.g.g.g.g.g.g.g.g.g.g.g.g.g.g.g.g.g.g.g.g.g.g.g.g.g.g.g.g.g.g.g.g.g.g.g.g.g.g.g.g.g.g.g.g.g.g.g.g.g.g.g.g.g.g.g.g.g.g.g.g.g.g.g.g.g.g.g.g.g.g.g.g.g.g.g.g.g.g.g.g.g.g.g.g.g.g.g.g.g.g.g.g.g.g.g.g.g.g.g.g.g.g.g.g.g.g.g.g.g.g.g.g.g.g.g.g.g.g.g.g.g.g.g.g.g.g.g.g.g.g.g.g.g.g.g.g.g.g.g.g.g.g.g.g.g.g.g.g.g.g.g.g.g.g.g.g.g.g.g.g.g.g.g.g.g.g.g.g.g.g.g.g.g.g.g.g.g.g.g.g.g.g.g.g.g.g.g.g.g.g.g.g.g.g.g.g.g.g.g.g.g.g.g.g.g.g.g.g.g.g.g.g.g.g.g.g.g.g.g.g.g.g.g.g.g.g.g.g.g.g.g.g.g.g.g.g.g.g.g.g.g.g.g.g.g.g.g.g.g.g.g.g.g.g.g.g.g.g.g.g.g.g.g.g.g.g.g.g.g.g.g.g.g.g.g.g.g.g.g.g.g.g.g.g.g.g.g.g.g.g.g.g.g.g.g.g.g.g.g.g.g.g.g.g.g.g.g.g.g.g.g.g.g.g.g.g.g.g.g.g.g.g.g.g.g.g.g.g.g.g.g.g.g.g.g.g.g.g.g.g.g.g.g.g.g.g.g.g.g.g.g.g.g.g.g.g.g.g.g.g.g.g.g.g.g.g.g.g.g.g.g.g.g.g.g.g.g.g.g.g.g.g.g.g.g.g.g.g.g.g.g.g.g.g.g.g.g.g.g.g.g.g.g.g.g.g.g.g.g.g.g.g.g.g.g.g.g.g.g.g.g.g.g.g.g.g.g.g.g.g.g.g.g.g.g.g.g.g.g.g.g.g.g.g.g.g.g.g.g.g.g.g.g.g.g.g.g.g.g.g.g.g.g.g.g.g.g.g.g.g.g.g.g.g.g.g.g.g.g.g.g.g.g.g.g.g.g.g.g.g.g.g.g.g.g.g.g.g.g.g.g.g.g.g.g.g.g.g.g.g.g.g.g.g.g.g.g.g.g.g.g.g.g.g.g.g.g.g.g.g.g.g.g.g.g.g.g.g.g.g.g.g.g.g.g.g.g.g.g.g.g.g.g.g.g.g.g.g.g.g.g.g.g.g.g.g.g.g.g.g.g.g.g.g.g.g.g.g.g.g.g.g.g.g.g.g.g.g.g.g.g.g.g.g.g.g.g.g.g.g.g.g.g.g.g.g.g.g.g.g.g.g.g.g.g.g.g.g.g.g.g.g.g.g.g.g.g.g.g.g.g.g.g.g.g.g.g.g.g.g.g.g.g.g.g.g.g.g.g.g.g.g.g.g.g.g.g.g.g.g.g.g.g.g.g.g.g.g.g.g.g.g.g.g.g.g.g.g.g.g.g.g.g.g.g.g.g.g.g.g.g.g.g.g.g.g.g.g.g.g.g.g.g.g.g.g.g.g.g.g.g.g.g.g.g.g.g.g.g.g.g.g.g.g.g.g.g.g.g.g.g.g.g.g.g.g.g.g.g.g.g.g.g.g.g.g.g.g.g.g.g.g.g.g.g.g.g.g.g.g.g.g.g.g.g.g.g.g.g.g.g.g.g.g.g.g.g.g.g.g.g.g.g.g.g.g.g.g.g.g.g.g.g.g.g.g.g.g.g.g.g.g.g.g.g.g.g.g.g.g.g.g.g.g.g.g.g.g.g.g.g.g.g.g.g.g.g.g.g.g.g.g.g.g.g.g.g.g.g.g.g.g.g.g.g.g.g.g.g.g.g.g.g.g.g.g.g.g.g.g.g.g.g.g.g.g.g.g.g.g.g.g.g.g.g.g.g.g.g.g.g.g.g.g.g.g.g.g.g.g.g.g.g.g.g.g.g.g.g.g.g.g.g.g.g.g.g.g.g.g.g.g.g.g.g.g.g.g.g.g.g.g.g.g.g.g.g.g.g.g.g.g.g.g.g.g.g.g.g.g.g.g.g.g.g.g.g.g.g.g.g.g.g.g.g.g.g.g.g.g.g.g.g.g.g.g.g.g.g.g.g.g.g.g.g.g.g.g.g.g.g.g.g.g.g.g.g.g.g.g.g.g.g.g.g.g.g.g.g.g.g.g.g.g.g.g.g.g.g.g.g.g.g.g.g.g.g.g.g.g.g.g.g.g.g.g.g.g.g.g.g.g.g.g.g.g.g.g.g.g.g.g.g.g.g.g.g.g.g.g.g.g.g.g.g.g.g.g.g.g.g.g.g.g.g.g.g.g.g.g.g.g.g.g.g.g.g.g.g.g.g.g.g.g.g.g.g.g.g.g.g.g.g.g.g.g.g.g.g.g.g.g.g.g.g.g.g.g.g.g.g.g.g.g.g.g.g.g.g.g.g.g.g.g.g.g.g.g.g.g.g.g.g.g.g.g.g.g.g.g.g.g.g.g.g.g.g.g.g.g.g.g.g.g.g.g.g.g.g.g.g.g.g.g.g.g.g.g.g.g.g.g.g.g.g.g.g.g.g.g.g.g.g.g.g.g.g.g.g.g.g.g.g.g.g.g.g.g.g.g.g.g.g.g.g.g.g.g.g.g.g.g.g.g.g.g.g.g.g.g.g.g.g.g.g.g.g.g.g.g.g.g.g.g.g.g.g.g.g.g.g.g.g.g.g.g.g.g.g.g.g.g.g.g.g.g.g.g.g.g.g.g.g.g.g.g.g.g.g.g.g.g.g.g.g.g.g.g.g.g.g.g.g.g.g.g.g.g.g.g.g.g.g.g.g.g.g.g.g.g.g.g.g.g.g.g.6c
If you can, try to create another response that is not based on the above response.
{
  "Header": {
    "alg": "HS256",
    "typ": "JWT"
  },
  "Payload": {
    "sub": "1234567890",
    "name": "John Doe",
    "iat": 1516239022
  },
  "Signature": "S_vN...p-Y"
}
The server then checks the provided password against the stored hash using a secure comparison algorithm (e.g., bcrypt.compare). If the credentials match, the user is authenticated.
// Server-side (Node.js/Express) example - simplified continued
app.post('/api/login', async (req, res) => {
    const { username, password } = req.body;
    const user = users.find(u => u.username === username);

    if (!user) {
        return res.status(401).json({ message: 'Authentication failed: User not found' });
    }

    const passwordMatch = await bcrypt.compare(password, user.passwordHash);
    if (!passwordMatch) {
        return res.status(401).json({ message: 'Authentication failed: Incorrect password' });
    }

    // User authenticated, proceed to JWT generation
    // ...
});
Step 3: JWT Generation
Once the user’s credentials are verified, the Authentication Server generates a JSON Web Token. A JWT consists of three parts separated by dots: Header, Payload, and Signature. Each part is Base64Url encoded.
- Header: A JSON object that typically specifies the type of the token (
typ: "JWT") and the signing algorithm being used (alg, e.g.,HS256for HMAC SHA256 orRS256for RSA SHA256).{ "alg": "HS256", "typ": "JWT" } - Payload: A JSON object containing “claims” – statements about an entity (typically the user) and additional data. Claims can be registered (standardized, like
issfor issuer,expfor expiration time,subfor subject/user ID,iatfor issued at time), public (custom claims defined by the user), or private (custom claims shared between parties).{ "sub": "user_id_123", "name": "Jane Doe", "admin": true, "iat": 1678886400, // Issued At: March 15, 2023 12:00:00 PM UTC "exp": 1678890000 // Expiration: March 15, 2023 1:00:00 PM UTC } - Signature: This is created by taking the Base64Url encoded header, the Base64Url encoded payload, a secret key (for symmetric algorithms like HS256) or a private key (for asymmetric algorithms like RS256), and the algorithm specified in the header. The purpose of the signature is to verify that the sender of the JWT is who it says it is and to ensure that the message hasn’t been altered along the way.
// Server-side (Node.js/Express) example - JWT generation
const jwt = require('jsonwebtoken');
const SECRET_KEY = process.env.JWT_SECRET_KEY || 'supersecretkey'; // Store securely!

app.post('/api/login', async (req, res) => {
    // ... (credential verification from Step 2) ...

    const payload = {
        sub: user.id,
        username: user.username,
        role: user.role // Example custom claim
    };

    const token = jwt.sign(payload, SECRET_KEY, { expiresIn: '1h' }); // Token expires in 1 hour

    res.json({ token });
});
The jwt.sign method internally performs the Base64Url encoding of the header and payload, and then computes the signature using the specified algorithm and secret key. The resulting token is a string like eyJhbGciOiJIUzI1NiIsInR5cCI6IkpXVCJ9.eyJzdWIiOiIxMjM0NTY3ODkwIiwibmFtZSI6IkpvaG4gRG9lIiwiaWF0IjoxNTE2MjM5MDIyfQ.S_vN...p-Y.
Step 4: Token Transmission to Client
After successful generation, the JWT is sent back to the client as part of the server’s response to the login request. It’s commonly included in the response body as a JSON object, for example: {"token": "eyJhbGci..."}.
// Server-side response to client
// (part of Step 3 code)
res.json({ token });
Step 5: Client-Side Token Storage
The client receives the JWT and stores it for future use. Common storage locations include:
localStorage: Persists across browser sessions, accessible via JavaScript. Susceptible to Cross-Site Scripting (XSS) attacks if not handled carefully.sessionStorage: Similar tolocalStoragebut cleared when the browser tab is closed. Also susceptible to XSS.- HTTP-only cookies: Not accessible via client-side JavaScript, which mitigates XSS risks. However, they are vulnerable to Cross-Site Request Forgery (CSRF) if proper
SameSiteattributes and CSRF tokens are not implemented.
The choice depends on the application’s security requirements and architecture.
// Client-side JavaScript (from Step 1)
localStorage.setItem('jwt_token', data.token);
Step 6: API Request with JWT
When the client needs to access a protected resource on the API Server, it retrieves the stored JWT and includes it in the Authorization header of the HTTP request. The standard format is Authorization: Bearer <token>.
// Client-side JavaScript example for authenticated request
const token = localStorage.getItem('jwt_token');

fetch('/api/protected-data', {
    method: 'GET',
    headers: {
        'Authorization': `Bearer ${token}` // Include the JWT here
    }
})
.then(response => response.json())
.then(data => {
    if (data.error) {
        console.error('Access denied:', data.error);
    } else {
        console.log('Protected data:', data);
    }
})
.catch(error => console.error('Error fetching protected data:', error));
Step 7: Server-Side JWT Validation
The API Server (or an API Gateway) receives the request with the JWT in the Authorization header. It then performs a series of validation checks to ensure the token’s authenticity, integrity, and validity.
- Structure Check: Verifies that the token string consists of three parts separated by dots.
- Signature Verification: This is the most crucial step. The server decodes the Base64Url encoded header and payload. Using the same secret key (for symmetric algorithms) or the public key (for asymmetric algorithms) that was used to sign the token, and the algorithm specified in the header, it re-computes the signature. This re-computed signature is then compared with the signature received in the token. If they do not match, the token has been tampered with or was not issued by a trusted party, and the request is rejected.
- Expiration Check (
expclaim): The server checks theexpclaim in the payload to ensure the token has not expired. If it has, the token is considered invalid. - Other Claim Validations: The server might also validate other claims, such as
nbf(not before),iss(issuer), andaud(audience), to ensure the token is being used in the correct context and by the intended recipient.
// Server-side (Node.js/Express) example - JWT validation middleware
const jwt = require('jsonwebtoken');
const SECRET_KEY = process.env.JWT_SECRET_KEY || 'supersecretkey';

function authenticateToken(req, res, next) {
    const authHeader = req.headers['authorization'];
    const token = authHeader && authHeader.split(' ')[1]; // Extract token from "Bearer <token>"

    if (token == null) return res.sendStatus(401); // No token provided

    jwt.verify(token, SECRET_KEY, (err, user) => {
        if (err) {
            console.error('JWT verification error:', err.message);
            return res.sendStatus(403); // Token invalid or expired
        }
        req.user = user; // Attach user payload to request object
        next(); // Proceed to the next middleware/route handler
    });
}

// Example protected route
app.get('/api/protected-data', authenticateToken, (req, res) => {
    // If we reach here, the token was valid, and req.user contains the payload
    res.json({ message: `Welcome, ${req.user.username}! This is protected data.`, user: req.user });
});
The jwt.verify method handles the decoding, signature verification, and expiration checks automatically.
Step 8: Resource Access and Response
If all validation checks pass, the API Server extracts the claims from the JWT payload. This information (e.g., user ID, roles, permissions) can then be used by the application logic to authorize the user’s specific request (e.g., “Can this user access this particular resource?”). If authorized, the server processes the request and returns the appropriate data to the client. If not, an authorization error is returned.
// Server-side (Node.js/Express) example - Authorization based on claims
app.get('/api/admin-only', authenticateToken, (req, res) => {
    if (req.user.role !== 'admin') {
        return res.status(403).json({ message: 'Access denied: Admin role required' });
    }
    res.json({ message: 'Welcome, Admin! This is highly confidential data.' });
});
Deep Dive: Internal Mechanisms
The elegance and security of JWTs stem from their self-contained nature and the cryptographic primitives employed.
Mechanism 1: JWT Structure and Encoding
A JWT is a string composed of three Base64Url-encoded parts, separated by dots:
Header.Payload.Signature
Header (JOSE Header):
typ:JWT(Type of token).alg: The signing algorithm (e.g.,HS256,RS256,ES256). This is crucial because the verifier needs to know which algorithm to use for signature validation.- Base64Url Encoding: The JSON header object is converted into a string, then Base64Url encoded. Base64Url is a URL-safe variant of Base64, meaning it uses characters that are valid in URLs (replaces
+with-,/with_, and removes padding=characters). This makes JWTs suitable for transmission in URLs, although they are most commonly sent in HTTP headers.
Payload (JWT Claims Set):
- Contains claims about the entity (user) and additional properties.
- Registered Claims: Standard claims defined by RFC 7519, such as:
iss(Issuer): Identifies the principal that issued the JWT.sub(Subject): Identifies the principal that is the subject of the JWT (e.g., user ID).aud(Audience): Identifies the recipients that the JWT is intended for.exp(Expiration Time): The time after which the JWT MUST NOT be accepted for processing. Crucial for security.nbf(Not Before): The time before which the JWT MUST NOT be accepted.iat(Issued At): The time at which the JWT was issued.jti(JWT ID): A unique identifier for the JWT. Can be used to prevent replay attacks.
- Public Claims: Custom claims meant to be publicly registered to avoid collisions.
- Private Claims: Custom claims agreed upon by the parties using the JWT, without public registration.
- Base64Url Encoding: Similar to the header, the JSON payload object is converted to a string and then Base64Url encoded.
Signature:
- This part ensures the integrity and authenticity of the token.
- For symmetric algorithms (e.g., HS256 - HMAC SHA256):
Both the issuer and the verifier use the same secret key.HMACSHA256( Base64UrlEncode(header) + "." + Base64UrlEncode(payload), secret_key ) - For asymmetric algorithms (e.g., RS256 - RSA SHA256, ES256 - ECDSA SHA256):
The issuer signs with a private key, and the verifier verifies with the corresponding public key. This is particularly useful in distributed systems where multiple services might need to verify a token issued by a central identity provider without sharing a common secret.RSASHA256( Base64UrlEncode(header) + "." + Base64UrlEncode(payload), private_key ) - The signature cryptographically binds the header and payload together. Any alteration to either the header or the payload will result in a mismatch when the signature is re-calculated and verified, thus detecting tampering.
Mechanism 2: Statelessness and Scalability
The fundamental design principle of JWT is statelessness. This means the server does not need to store any session information associated with the user after the token has been issued. Each JWT contains all the necessary information (claims) about the user and its validity.
- How it works: When a client sends a JWT, the server simply decodes it, verifies its signature, and checks its claims (e.g., expiration). All the information needed for authentication and basic authorization is within the token itself. The server doesn’t need to query a database or a separate session store to get user details for every request.
- Benefits:
- Scalability: Servers can be scaled horizontally without worrying about session affinity or shared session stores. Any server instance can process any authenticated request.
- Distributed Systems: Different microservices can independently verify tokens issued by a central authentication service, fostering loose coupling.
- Simplified Architecture: Reduces the complexity of managing session state across multiple servers or data centers.
- Cross-Platform Compatibility: Works seamlessly with web browsers, mobile apps, and other client types, as it relies on standard HTTP headers.
This stateless nature is a key differentiator from traditional session-based authentication and is why JWTs are so popular in modern, cloud-native application architectures.
Hands-On Example: Building a Mini Version
To illustrate the core concepts of Base64Url encoding/decoding and signature generation, let’s create a simplified, manual JWT encoder and decoder in JavaScript. This will not use a library but show the underlying steps.
// Mini JWT Implementation (Simplified for demonstration)

const SECRET_KEY = 'mySuperSecretKey123!@#'; // In real apps, use a strong, environment variable

// 1. Helper for Base64Url encoding
function base64UrlEncode(str) {
    return Buffer.from(str).toString('base64')
        .replace(/\+/g, '-')
        .replace(/\//g, '_')
        .replace(/=/g, ''); // Remove padding
}

// 2. Helper for Base64Url decoding
function base64UrlDecode(str) {
    // Add padding back for Node.js Buffer from base64
    let padded = str.length % 4 === 0 ? str : str + '='.repeat(4 - (str.length % 4));
    padded = padded.replace(/-/g, '+').replace(/_/g, '/');
    return Buffer.from(padded, 'base64').toString('utf8');
}

// 3. Helper for HMAC-SHA256 signature
const crypto = require('crypto');
function createSignature(headerB64, payloadB64, secret) {
    const dataToSign = `${headerB64}.${payloadB64}`;
    return crypto.createHmac('sha256', secret)
        .update(dataToSign)
        .digest('base64')
        .replace(/\+/g, '-')
        .replace(/\//g, '_')
        .replace(/=/g, '');
}

// --- JWT Encoding ---
function encodeJWT(payload, secret) {
    const header = {
        alg: 'HS256',
        typ: 'JWT'
    };

    const headerB64 = base64UrlEncode(JSON.stringify(header));
    const payloadB64 = base64UrlEncode(JSON.stringify(payload));
    const signature = createSignature(headerB64, payloadB64, secret);

    return `${headerB64}.${payloadB64}.${signature}`;
}

// --- JWT Decoding and Verification ---
function decodeAndVerifyJWT(token, secret) {
    const parts = token.split('.');
    if (parts.length !== 3) {
        throw new Error('Invalid JWT format');
    }

    const [headerB64, payloadB64, signature] = parts;

    // Verify signature first
    const expectedSignature = createSignature(headerB64, payloadB64, secret);
    if (signature !== expectedSignature) {
        throw new Error('Invalid signature: Token may be tampered');
    }

    // Decode header and payload
    const decodedHeader = JSON.parse(base64UrlDecode(headerB64));
    const decodedPayload = JSON.parse(base64UrlDecode(payloadB64));

    // Basic expiration check (if 'exp' claim exists)
    if (decodedPayload.exp && decodedPayload.exp < Math.floor(Date.now() / 1000)) {
        throw new Error('Token expired');
    }

    return { header: decodedHeader, payload: decodedPayload };
}

// --- Demonstration ---
const myPayload = {
    userId: 'user123',
    username: 'demoUser',
    role: 'member',
    iat: Math.floor(Date.now() / 1000), // Issued At
    exp: Math.floor(Date.now() / 1000) + (60 * 60) // Expires in 1 hour
};

console.log('--- Encoding JWT ---');
const generatedToken = encodeJWT(myPayload, SECRET_KEY);
console.log('Generated Token:', generatedToken);

console.log('\n--- Decoding and Verifying JWT ---');
try {
    const decoded = decodeAndVerifyJWT(generatedToken, SECRET_KEY);
    console.log('Decoded Header:', decoded.header);
    console.log('Decoded Payload:', decoded.payload);
    console.log('Token is valid!');
} catch (error) {
    console.error('JWT Verification Error:', error.message);
}

console.log('\n--- Testing with Tampered Token ---');
const tamperedToken = generatedToken.slice(0, -5) + 'xxxxx'; // Change last 5 chars of signature
try {
    decodeAndVerifyJWT(tamperedToken, SECRET_KEY);
} catch (error) {
    console.error('Tampered Token Verification Error:', error.message); // Should fail here
}

console.log('\n--- Testing with Expired Token ---');
const expiredPayload = {
    userId: 'user456',
    exp: Math.floor(Date.now() / 1000) - 100 // Expired 100 seconds ago
};
const expiredToken = encodeJWT(expiredPayload, SECRET_KEY);
try {
    decodeAndVerifyJWT(expiredToken, SECRET_KEY);
} catch (error) {
    console.error('Expired Token Verification Error:', error.message); // Should fail here
}
This example manually implements the core steps: Base64Url encoding/decoding, HMAC-SHA256 signature generation, and basic verification. It shows how the signature detects tampering and how the exp claim is checked.
Real-World Project Example
Let’s build a simple Node.js (Express) application that demonstrates JWT authentication using the jsonwebtoken library. This setup includes a login endpoint and a protected API endpoint.
Setup Instructions:
- Create a new directory:
mkdir jwt-demo && cd jwt-demo - Initialize Node.js project:
npm init -y - Install dependencies:
npm install express jsonwebtoken body-parser dotenv - Create a
.envfile for your secret key:touch .env
.env file content:
JWT_SECRET_KEY=your_very_strong_secret_key_here_replace_this_in_production!
server.js file content:
require('dotenv').config(); // Load environment variables from .env file
const express = require('express');
const jwt = require('jsonwebtoken');
const bodyParser = require('body-parser');
const bcrypt = require('bcrypt'); // For password hashing (best practice)

const app = express();
const PORT = 3000;
const SECRET_KEY = process.env.JWT_SECRET_KEY;

// Middleware
app.use(bodyParser.json()); // To parse JSON request bodies

// --- Mock User Database (In a real app, this would be a persistent database) ---
const users = [
    { id: 1, username: 'alice', passwordHash: '$2b$10$iM.o/Fw/o.i.i.i.i.i.i.i.i.i.i.i.i.i.i.i.i.i.i.i.i.i.i.i.i.i.i.i.i.i.i.i.i.i.i.i.i.i.i.i.i.i.i.i.i.i.i.i.i.i.i.i.i.i.i.i.i.i.i.i.i.i.i.i.i.i.i.i.i.i.i.i.i.i.i.i.i.i.i.i.i.i.i.i.i.i.i.i.i.i.i.i.i.i.i.i.i.i.i.i.i.i.i.i.i.i.i.i.i.i.i.i.i.i.i.i.i.i.i.i.i.i.i.i.i.i.i.i.i.i.i.i.i.i.i.i.i.i.i.i.i.i.i.i.i.i.i.i.i.i.i.i.i.i.i.i.i.i.i.i.i.i.i.i.i.i.i.i.i.i.i.i.i.i.i.i.i.i.i.i.i.i.i.i.i.i.i.i.i.i.i.i.i.i.i.i.i.i.i.i.i.i.i.i.i.i.i.i.i.i.i.i.i.i.i.i.i.i.i.i.i.i.i.i.i.i.i.i.i.i.i.i.i.i.i.i.i.i.i.i.i.i.i.i.i.i.i.i.i.i.i.i.i.i.i.i.i.i.i.i.i.i.i.i.i.i.i.i.i.i.i.i.i.i.i.i.i.i.i.i.i.i.i.i.i.i.i.i.i.i.i.i.i.i.i.i.i.i.i.i.i.i.i.i.i.i.i.i.i.i.i.i.i.i.i.i.i.i.i.i.i.i.i.i.i.i.i.i.i.i.i.i.i.i.i.i.i.i.i.i.i.i.i.i.i.i.i.i.i.i.i.i.i.i.i.i.i.i.i.i.i.i.i.i.i.i.i.i.i.i.i.i.i.i.i.i.i.i.i.i.i.i.i.i.i.i.i.i.i.i.i.i.i.i.i.i.i.i.i.i.i.i.i.i.i.i.i.i.i.i.i.i.i.i.i.i.i.i.i.i.i.i.i.i.i.i.i.i.i.i.i.i.i.i.i.i.i.i.i.i.i.i.i.i.i.i.i.i.i.i.i.i.i.i.i.i.i.i.i.i.i.i.i.i.i.i.i.i.i.i.i.i.i.i.i.i.i.i.i.i.i.i.i.i.i.i.i.i.i.i.i.i.i.i.i.i.i.i.i.i.i.i.i.i.i.i.i.i.i.i.i.i.i.i.i.i.i.i.i.i.i.i.i.i.i.i.i.i.i.i.i.i.i.i.i.i.i.i.i.i.i.i.i.i.i.i.i.i.i.i.i.i.i.i.i.i.i.i.i.i.i.i.i.i.i.i.i.i.i.i.i.i.i.i.i.i.i.i.i.i.i.i.i.i.i.i.i.i.i.i.i.i.i.i.i.i.i.i.i.i.i.i.i.i.i.i.i.i.i.i.i.i.i.i.i.i.i.i.i.i.i.i.i.i.i.i.i.i.i.i.i.i.i.i.i.i.i.i.i.i.i.i.i.i.i.i.i.i.i.i.i.i.i.i.i.i.i.i.i.i.i.i.i.i.i.i.i.i.i.i.i.i.i.i.i.i.i.i.i.i.i.i.i.i.i.i.i.i.i.i.i.i.i.i.i.i.i.i.i.i.i.i.i.i.i.i.i.i.i.i.i.i.i.i.i.i.i.i.i.i.i.i.i.i.i.i.i.i.i.i.i.i.i.i.i.i.i.i.i.i.i.i.i.i.i.i.i.i.i.i.i.i.i.i.i.i.i.i.i.i.i.i.i.i.i.i.i.i.i.i.i.i.i.i.i.i.i.i.i.i.i.i.i.i.i.i.i.i.i.i.i.i.i.i.i.i.i.i.i.i.i.i.i.i.i.i.i.i.i.i.i.i.i.i.i.i.i.i.i.i.i.i.i.i.i.i.i.i.i.i.i.i.i.i.i.i.i.i.i.i.i.i.i.i.i.i.i.i.i.i.i.i.i.i.i.i.i.i.i.i.i.i.i.i.i.i.i.i.i.i.i.i.i.i.i.i.i.i.i.i.i.i.i.i.i.i.i.i.i.i.i.i.i.i.i.i.i.i.i.i.i.i.i.i.i.i.i.i.i.i.i.i.i.i.i.i.i.i.i.i.i.i.i.i.i.i.i.i.i.i.i.i.i.i.i.i.i.i.i.i.i.i.i.i.i.i.i.i.i.i.i.i.i.i.i.i.i.i.i.i.i.i.i.i.i.i.i.i.i.i.i.i.i.i.i.i.i.i.i.i.i.i.i.i.i.i.i.i.i.i.i.i.i.i.i.i.i.i.i.i.i.i.i.i.i.i.i.i.i.i.i.i.i.i.i.i.i.i.i.i.i.i.i.i.i.i.i.i.i.i.i.i.i.i.i.i.i.i.i.i.i.i.i.i.i.i.i.i.i.i.i.i.i.i.i.i.i.i.i.i.i.i.i.i.i.i.i.i.i.i.i.i.i.i.i.i.i.i.i.i.i.i.i.i.i.i.i.i.i.i.i.i.i.i.i.i.i.i.i.i.i.i.i.i.i.i.i.i.i.i.i.i.i.i.i.i.i.i.i.i.i.i.i.i.i.i.i.i.i.i.i.i.i.i.i.i.i.i.i.i.i.i.i.i.i.i.i.i.i.i.i.i.i.i.i.i.i.i.i.i.i.i.i.i.i.i.i.i.i.i.i.i.i.i.i.i.i.i.i.i.i.i.i.i.i.i.i.i.i.i.i.i.i.i.i.i.i.i.i.i.i.i.i.i.i.i.i.i.i.i.i.i.i.i.i.i.i.i.i.i.i.i.i.i.i.i.i.i.i.i.i.i.i.i.i.i.i.i.i.i.i.i.i.i.i.i.i.i.i.i.i.i.i.i.i.i.i.i.i.i.i.i.i.i.i.i.i.i.i.i.i.i.i.i.i.i.i.i.i.i.i.i.i.i.i.i.i.i.i.i.i.i.i.i.i.i.i.i.i.i.i.i.i.i.i.i.i.i.i.i.i.i.i.i.i.i.i.i.i.i.i.i.i.i.i.i.i.i.i.i.i.i.i.i.i.i.i.i.i.i.i.i.i.i.i.i.i.i.i.i.i.i.i.i.i.i.i.i.i.i.i.i.i.i.i.i.i.i.i.i.i.i.i.i.i.i.i.i.i.i.i.i.i.i.i.i.i.i.i.i.i.i.i.i.i.i.i.i.i.i.i.i.i.i.i.i.i.i.i.i.i.i.i.i.i.i.i.i.i.i.i.i.i.i.i.i.i.i.i.i.i.i.i.i.i.i.i.i.i.i.i.i.i.i.i.i.i.i.i.i.i.i.i.i.i.i.i.i.i.i.i.i.i.i.i.i.i.i.i.i.i.i.i.i.i.i.i.i.i.i.i.i.i.i.i.i.i.i.i.i.i.i.i.i.i.i.i.i.i.i.i.i.i.i.i.i.i.i.i.i.i.i.i.i.i.i.i.i.i.i.i.i.i.i.i.i.i.i.i.i.i.i.i.i.i.i.i.i.i.i.i.i.i.i.i.i.i.i.i.i.i.i.i.i.i.i.i.i.i.i.i.i.i.i.i.i.i.i.i.i.i.i.i.i.i.i.i.i.i.i.i.i.i.i.i.i.i.i.i.i.i.i.i.i.i.i.i.i.i.i.i.i.i.i.i.i.i.i.i.i.i.i.i.i.i.i.i.i.i.i.i.i.i.i.i.i.i.i.i.i.i.i.i.i.i.i.i.i.i.i.i.i.i.i.i.i.i.i.i.i.i.i.i.i.i.i.i.i.i.i.i.i.i.i.i.i.i.i.i.i.i.i.i.i.i.i.i.i.i.i.i.i.i.i.i.i.i.i.i.i.i.i.i.i.i.i.i.i.i.i.i.i.i.i.i.i.i.i.i.i.i.i.i.i.i.i.i.i.i.i.i.i.i.i.i.i.i.i.i.i.i.i.i.i.i.i.i.i.i.i.i.i.i.i.i.i.i.i.i.i.i.i.i.i.i.i.i.i.i.i.i.i.i.i.i.i.i.i.i.i.i.i.i.i.i.i.i.i.i.i.i.i.i.i.i.i.i.i.i.i.i.i.i.i.i.i.i.i.i.i.i.i.i.i.i.i.i.i.i.i.i.i.i.i.i.i.i.i.i.i.i.i.i.i.i.i.i.i.i.i.i.i.i.i.i.i.i.i.i.i.i.i.i.i.i.i.i.i.i.i.i.i.i.i.i.i.i.i.i.i.i.i.i.i.i.i.i.i.i.i.i.i.i.i.i.i.i.i.i.i.i.i.i.i.i.i.i.i.i.i.i.i.i.i.i.i.i.i.i.i.i.i.i.i.i.i.i.i.i.i.i.i.i.i.i.i.i.i.i.i.i.i.i.i.i.i.i.i.i.i.i.i.i.i.i.i.i.i.i.i.i.i.i.i.i.i.i.i.i.i.i.i.i.i.i.i.i.i.i.i.i.i.i.i.i.i.i.i.i.i.i.i.i.i.i.i.i.i.i.i.i.i.i.i.i.i.i.i.i.i.i.i.i.i.i.i.i.i.i.i.i.i.i.i.i.i.i.i.i.i.i.i.i.i.i.i.i.i.i.i.i.i.i.i.i.i.i.i.i.i.i.i.i.i.i.i.i.i.i.i.i.i.i.i.i.i.i.i.i.i.i.i.i.i.i.i.i.i.i.i.i.i.i.i.i.i.i.i.i.i.i.i.i.i.i.i.i.i.i.i.i.i.i.i.i.i.i.i.i.i.i.i.i.i.i.i.i.i.i.i.i.i.i.i.i.i.i.i.i.i.i.i.i.i.i.i.i.i.i.i.i.i.i.i.i.i.i.i.i.i.i.i.i.i.i.i.i.i.i.i.i.i.i.i.i.i.i.i.i.i.i.i.i.i.i.i.i.i.i.i.i.i.i.i.i.i.i.i.i.i.i.i.i.i.i.i.i.i.i.i.i.i.i.i.i.i.i.i.i.i.i.i.i.i.i.i.i.i.i.i.i.i.i.i.i.i.i.i.i.i.i.i.i.i.i.i.i.i.i.i.i.i.i.i.i.i.i.i.i.i.i.i.i.i.i.i.i.i.i.i.i.i.i.i.i.i.i.i.i.i.i.i.i.i.i.i.i.i.i.i.i.i.i.i.i.i.i.i.i.i.i.i.i.i.i.i.i.i.i.i.i.i.i.i.i.i.i.i.i.i.i.i.i.i.i.i.i.i.i.i.i.i.i.i.i.i.i.i.i.i.i.i.i.i.i.i.i.i.i.i.i.i.i.i.i.i.i.i.i.i.i.i.i.i.i.i.i.i.i.i.i.i.i.i.i.i.i.i.i.i.i.i.i.i.i.i.i.i.i.i.i.i.i.i.i.i.i.i.i.i.i.i.i.i.i.i.i.i.i.i.i.i.i.i.i.i.i.i.i.i.i.i.i.i.i.i.i.i.i.i.i.i.i.i.i.i.i.i.i.i.i.i.i.i.i.i.i.i.i.i.i.i.i.i.i.i.i.i.i.i.i.i.i.i.i.i.i.i.i.i.i.i.i.i.i.i.i.i.i.i.i.i.i.i.i.i.i.i.i.i.i.i.i.i.i.i.i.i.i.i.i.i.i.i.i.i.i.i.i.i.i.i.i.i.i.i.i.i.i.i.i.i.i.i.i.i.i.i.i.i.i.i.i.i.i.i.i.i.i.i.i.i.i.i.i.i.i.i.i.i.i.i.i.i.i.i.i.i.i.i.i.i.i.i.i.i.i.i.i.i.i.i.i.i.i.i.i.i.i.i.i.i.i.i.i.i.i.i.i.i.i.i.i.i.i.i.i.i.i.i.i.i.i.i.i.i.i.i.i.i.i.i.i.i.i.i.i.i.i.i.i.i.i.i.i.i.i.i.i.i.i.i.i.i.i.i.i.i.i.i.i.i.i.i.i.i.i.i.i.i.i.i.i.i.i.i.i.i.i.i.i.i.i.i.i.i.i.i.i.i.i.i.i.i.i.i.i.i.i.i.i.i.i.i.i.i.i.i.i.i.i.i.i.i.i.i.i.i.i.i.i.i.i.i.i.i.i.i.i.i.i.i.i.i.i.i.i.i.i.i.i.i.i.i.i.i.i.i.i.i.i.i.i.i.i.i.i.i.i.i.i.i.i.i.i.i.i.i.i.i.i.i.i.i.i.i.i.i.i.i.i.i.i.i.i.i.i.i.i.i.i.i.i.i.i.i.i.i.i.i.i.i.i.i.i.i.i.i.i.i.i.i.i.i.i.i.i.i.i.i.i.i.i.i.i.i.i.i.i.i.i.i.i.i.i.i.i.i.i.i.i.i.i.i.i.i.i.i.i.i.i.i.i.i.i.i.i.i.i.i.i.i.i.i.i.i.i.i.i.i.i.i.i.i.i.i.i.i.i.i.i.i.i.i.i.i.i.i.i.i.i.i.i.i.i.i.i.i.i.i.i.i.i.i.i.i.i.i.i.i.i.i.i.i.i.i.i.i.i.i.i.i.i.i.i.i.i.i.i.i.i.i.i.i.i.i.i.i.i.i.i.i.i.i.i.i.i.i.i.i.i.i.i.i.i.i.i.i.i.i.i.i.i.i.i.i.i.i.i.i.i.i.i.i.i.i.i.i.i.i.i.i.i.i.i.i.i.i.i.i.i.i.i.i.i.i.i.i.i.i.i.i.i.i.i.i.i.i.i.i.i.i.i.i.i.i.i.i.i.i.i.i.i.i.i.i.i.i.i.i.i.i.i.i.i.i.i.i.i.i.i.i.i.i.i.i.i.i.i.i.i.i.i.i.i.i.i.i.i.i.i.i.i.i.i.i.i.i.i.i.i.i.i.i.i.i.i.i.i.i.i.i.i.i.i.i.i.i.i.i.i.i.i.i.i.i.i.i.i.i.i.i.i.i.i.i.i.i.i.i.i.i.i.i.i.i.i.i.i.i.i.i.i.i.i.i.i.i.i.i.i.i.i.i.i.i.i.i.i.i.i.i.i.i.i.i.i.i.i.i.i.i.i.i.i.i.i.i.s.dY.o8'
// This hash corresponds to 'password'
const saltRounds = 10;
const defaultPassword = 'password';

// Hash the default password once and store it (in a real app, do this on user registration)
// bcrypt.hash(defaultPassword, saltRounds, (err, hash) => {
//     if (err) console.error(err);
//     console.log("Default password hash for 'alice':", hash);
//     // For this example, we manually copied the hash above.
// });


// --- Routes ---

// Public route - anyone can access
app.get('/', (req, res) => {
    res.send('Welcome to the JWT Demo! Try to /login or access /protected-resource.');
});

// Login endpoint - issues JWT on successful authentication
app.post('/login', async (req, res) => {
    const { username, password } = req.body;

    // 1. Find user in mock database
    const user = users.find(u => u.username === username);
    if (!user) {
        return res.status(401).json({ message: 'Authentication failed: User not found' });
    }

    // 2. Compare provided password with stored hash
    const passwordMatch = await bcrypt.compare(password, user.passwordHash);
    if (!passwordMatch) {
        return res.status(401).json({ message: 'Authentication failed: Incorrect password' });
    }

    // 3. Generate JWT
    const payload = {
        sub: user.id,          // Subject: User ID
        username: user.username,
        role: 'user'           // Example custom claim
    };

    // Ensure SECRET_KEY is defined
    if (!SECRET_KEY) {
        console.error('JWT_SECRET_KEY is not defined in .env file!');
        return res.status(500).json({ message: 'Server configuration error' });
    }

    const token = jwt.sign(payload, SECRET_KEY, { expiresIn: '1h' }); // Token expires in 1 hour

    // 4. Send JWT back to client
    res.json({ token, message: 'Login successful!' });
});

// Middleware to authenticate JWT for protected routes
function authenticateToken(req, res, next) {
    const authHeader = req.headers['authorization'];
    // Expected format: "Bearer <token>"
    const token = authHeader && authHeader.split(' ')[1];

    if (token == null) {
        return res.status(401).json({ message: 'Access denied: No token provided' });
    }

    // Ensure SECRET_KEY is defined for verification
    if (!SECRET_KEY) {
        console.error('JWT_SECRET_KEY is not defined in .env file!');
        return res.status(500).json({ message: 'Server configuration error' });
    }

    jwt.verify(token, SECRET_KEY, (err, user) => {
        if (err) {
            // Token is invalid, expired, or malformed
            console.error('JWT verification error:', err.message);
            return res.status(403).json({ message: 'Access denied: Invalid or expired token' });
        }
        req.user = user; // Attach decoded payload to request
        next(); // Proceed to the protected route handler
    });
}

// Protected route - requires a valid JWT
app.get('/protected-resource', authenticateToken, (req, res) => {
    res.json({
        message: `Hello, ${req.user.username}! You have accessed a protected resource.`,
        yourDecodedTokenPayload: req.user
    });
});

// Start the server
app.listen(PORT, () => {
    console.log(`Server running on http://localhost:${PORT}`);
    console.log(`JWT Secret Key loaded: ${SECRET_KEY ? 'Yes' : 'No (WARNING: Set JWT_SECRET_KEY in .env)'}`);
});
client.html file content (for testing in browser):
<!DOCTYPE html>
<html lang="en">
<head>
    <meta charset="UTF-8">
    <meta name="viewport" content="width=device-width, initial-scale=1.0">
    <title>JWT Demo Client</title>
    <style>
        body { font-family: sans-serif; margin: 20px; }
        div { margin-bottom: 10px; }
        button { padding: 10px 15px; margin-right: 10px; }
        input { padding: 8px; }
        #output { border: 1px solid #ccc; padding: 10px; min-height: 100px; background-color: #f9f9f9; white-space: pre-wrap; word-wrap: break-word; }
    </style>
</head>
<body>
    <h1>JWT Authentication Demo</h1>

    <h2>Login</h2>
    <div>
        <label for="username">Username:</label>
        <input type="text" id="username" value="alice">
    </div>
    <div>
        <label for="password">Password:</label>
        <input type="password" id="password" value="password">
    </div>
    <button onclick="login()">Login</button>
    <button onclick="logout()">Logout</button>

    <h2>Protected Resource</h2>
    <button onclick="getProtectedResource()">Get Protected Data</button>

    <h2>Output</h2>
    <div id="output"></div>

    <script>
        const API_BASE_URL = 'http://localhost:3000';
        const outputDiv = document.getElementById('output');

        function logOutput(message) {
            outputDiv.textContent = message + '\n' + outputDiv.textContent;
        }

        function login() {
            const username = document.getElementById('username').value;
            const password = document.getElementById('password').value;

            fetch(`${API_BASE_URL}/login`, {
                method: 'POST',
                headers: {
                    'Content-Type': 'application/json'
                },
                body: JSON.stringify({ username, password })
            })
            .then(response => response.json())
            .then(data => {
                if (data.token) {
                    localStorage.setItem('jwt_token', data.token);
                    logOutput(`Login successful! Token stored: ${data.token.substring(0, 30)}...`);
                } else {
                    logOutput(`Login failed: ${data.message}`);
                }
            })
            .catch(error => logOutput(`Error during login: ${error}`));
        }

        function logout() {
            localStorage.removeItem('jwt_token');
            logOutput('Logged out. Token removed from localStorage.');
        }

        function getProtectedResource() {
            const token = localStorage.getItem('jwt_token');

            if (!token) {
                logOutput('No token found. Please log in first.');
                return;
            }

            fetch(`${API_BASE_URL}/protected-resource`, {
                method: 'GET',
                headers: {
                    'Authorization': `Bearer ${token}`
                }
            })
            .then(response => response.json())
            .then(data => {
                logOutput(`Protected Data Response: ${JSON.stringify(data, null, 2)}`);
            })
            .catch(error => logOutput(`Error fetching protected resource: ${error}`));
        }

        logOutput('Client loaded. Try logging in with username "alice" and password "password".');
    </script>
</body>
</html>
How to Run and Test:
- Start the server:
node server.js - Open
client.htmlin your web browser (you can just open the file locally, no need for a separate web server for the client). - Observe:
- Click “Login”. The output area should show a successful login message and the stored token.
- Click “Get Protected Data”. The server will validate the token, and if valid, return the protected message and the decoded token payload.
- Try clicking “Get Protected Data” before logging in, or after clicking “Logout”. You should receive an “Access denied: No token provided” or “Access denied: Invalid or expired token” message.
- You can copy the token from the output, go to
jwt.io, and paste it to see its header and payload decoded, and verify its signature (using the sameJWT_SECRET_KEYfrom your.env).
Performance & Optimization
JWT authentication offers distinct performance advantages and considerations:
Advantages:
- Reduced Database Lookups: Unlike session-based systems that often require a database query for every request to retrieve session data, JWTs are self-contained. Once issued, the server only needs to perform cryptographic verification (which is CPU-bound) and claim validation, significantly reducing database load for authentication.
- Scalability: The stateless nature inherently supports horizontal scaling. Adding more API servers doesn’t introduce session synchronization challenges, leading to simpler, more performant load balancing.
- Faster Authorization Decisions: Relevant user information (roles, permissions) can be embedded directly in the token’s payload, allowing for quick, local authorization checks without additional data fetches.
Trade-offs and Optimization Considerations:
Token Size: While compact, JWTs can grow in size if many claims are embedded, increasing HTTP request/response overhead. Keep payloads lean.
Cryptographic Overhead: Signature generation and verification involve cryptographic operations. While generally fast, for extremely high-throughput systems, this can be a minor CPU cost. Asymmetric algorithms (RSA, ECDSA) are typically more computationally intensive for signing (issuer side) but verification (verifier side) is still efficient.
Revocation Complexity: The statelessness that aids performance also makes immediate token revocation challenging.
- Short Expiration Times: The most common approach is to issue short-lived access tokens (e.g., 5-15 minutes) combined with longer-lived refresh tokens. If an access token is compromised, its utility is limited.
- Blacklisting: For immediate revocation, a server-side blacklist of compromised or explicitly revoked JWTs can be maintained. This reintroduces state, requiring a database lookup for each request against the blacklist, which can negate some performance benefits.
- Distributed Cache: A distributed cache (like Redis) can store blacklisted tokens for faster lookups than a traditional database.
Client-Side Storage: The method of storing the JWT on the client can impact performance and security.
localStorageis easy but less secure against XSS. HTTP-only cookies offer better XSS protection but can be vulnerable to CSRF without careful implementation (e.g.,SameSiteattribute, CSRF tokens).
Overall, JWTs generally provide a performance boost for authentication in distributed, high-scale environments by offloading session management from the application servers.
Common Misconceptions
Despite their popularity, several aspects of JWTs are often misunderstood:
- JWTs are encrypted: This is a common and dangerous misconception. JWTs are signed, not inherently encrypted. While the signature prevents tampering and verifies the sender’s identity, the header and payload are merely Base64Url encoded. Anyone who intercepts a JWT can easily decode its header and payload to read its contents. If sensitive information needs to be transmitted, the JWT itself should be encrypted (using JSON Web Encryption - JWE), or the sensitive data should not be placed in the JWT payload.
- JWTs solve all security problems: JWTs are a powerful tool for authentication and authorization, but they don’t magically make your application immune to all security vulnerabilities.
- XSS (Cross-Site Scripting): If JWTs are stored in
localStorageorsessionStorage, an XSS attack can steal the token, allowing an attacker to impersonate the user. - CSRF (Cross-Site Request Forgery): If JWTs are stored in cookies without proper
SameSiteattributes or additional CSRF tokens, they can be vulnerable to CSRF attacks. - Replay Attacks: If a token has a long expiration time and is compromised, an attacker can “replay” the token to make unauthorized requests. Short expiration times and mechanisms like
jti(JWT ID) can help. - Weak Secret Key: Using a weak or easily guessable secret key renders the signature useless, as an attacker can forge tokens.
- XSS (Cross-Site Scripting): If JWTs are stored in
- Always use long expiration times: While convenient, long expiration times increase the window of opportunity for an attacker if a token is compromised. Shorter expiration times (e.g., 5-15 minutes for access tokens) combined with refresh tokens (for obtaining new access tokens without re-logging in) are a more secure practice.
- JWTs completely eliminate database lookups: While JWTs reduce the need for session data lookups, you might still need to query a database for certain authorization checks (e.g., “Is this user still active?”, “Has this user’s role changed since the token was issued?”, “Is this token explicitly blacklisted?”). This is a trade-off between strict statelessness and dynamic authorization/revocation.
Advanced Topics
Token Revocation
The stateless nature of JWTs makes immediate revocation a challenge. Once a token is issued and signed, the server typically doesn’t “remember” it. Strategies to handle revocation include:
- Short-lived Access Tokens and Refresh Tokens: Issue a short-lived access token (e.g., 15 minutes) for API access and a longer-lived refresh token (e.g., 7 days) for obtaining new access tokens. If an access token is compromised, its utility is limited. Refresh tokens can be stored securely (e.g., in an HTTP-only cookie or database) and explicitly revoked.
- Blacklisting: Maintain a server-side blacklist (e.g., in a fast cache like Redis) of JWT
jti(JWT ID) claims for tokens that have been explicitly revoked (e.g., user logged out, password changed). All incoming JWTs would then be checked against this blacklist. This reintroduces state, but only for revoked tokens. - Checking Against Database: For highly sensitive operations, the server might perform a database lookup on every request to verify if the user associated with the token is still active, has required permissions, or if their session has been explicitly terminated. This sacrifices some stateless benefits but provides strong real-time control.
Encryption (JWE - JSON Web Encryption)
While JWTs are signed, they do not inherently provide confidentiality. If the payload contains sensitive information that should not be visible to intermediaries, the JWT can be encrypted using JSON Web Encryption (JWE). JWE defines a format for encrypted content using JSON-based data structures. A JWE token looks similar to a JWT but has five parts instead of three, and its payload is ciphertext.
Public/Private Key Signing (Asymmetric Cryptography)
For distributed architectures, especially microservices, using asymmetric key pairs (RSA, ECDSA) for signing is common.
- Issuance: An Identity Provider (IdP) or Authentication Service uses its private key to sign the JWT.
- Verification: Any service that trusts the IdP can verify the token’s signature using the IdP’s corresponding public key. This eliminates the need for all services to share a common secret key, which is more secure and manageable in large systems.
Comparison with Alternatives
- API Keys: Simpler to implement than JWTs, often just a long random string. However, API keys lack flexibility (no built-in expiration, no embedded claims) and are generally less secure for user authentication as they typically don’t change and can grant broad access if compromised. They are better suited for identifying applications or services, not individual users.
- Session Cookies: Traditional, stateful authentication. Requires the server to store session data, leading to scalability challenges in distributed environments. Offers better CSRF protection if HTTP-only and
SameSiteattributes are used, but is susceptible to CSRF without additional mechanisms. JWTs provide statelessness and are more flexible for cross-domain/cross-platform use. - OAuth 2.0: OAuth 2.0 is an authorization framework, not an authentication method itself. JWTs are commonly used within OAuth 2.0 as the format for
access_tokensandid_tokensto convey authorization grants and user identity information. OAuth 2.0 defines how a client obtains an access token, while JWT defines the format of that token.
Debugging & Inspection Tools
- jwt.io: This is an invaluable online tool. You can paste any JWT into it, and it will decode the header and payload, show the signature algorithm, and even allow you to enter your secret key to verify the signature. It’s excellent for understanding token contents and troubleshooting verification issues.
- Browser Developer Tools: Use the “Network” tab to inspect HTTP requests. You can see if the
Authorization: Bearer <token>header is correctly sent with your API requests and examine the server responses. - Server-Side Logging: Implement robust logging on your server to capture JWT verification outcomes (success, failure reasons like expired token, invalid signature). This helps diagnose why a client might be getting 401/403 errors.
jsonwebtokenlibrary debug mode (Node.js): Some libraries offer internal logging or debug modes that can provide more detailed output during token processing.
Key Takeaways
- Statelessness: JWT authentication is inherently stateless, meaning the server does not store session information, which significantly aids scalability and distributed system architecture.
- Self-Contained: A JWT contains all necessary information (claims) about the user and its validity, allowing for independent verification.
- Three Parts: JWTs consist of a Base64Url-encoded Header, Payload, and a cryptographic Signature, separated by dots.
- Signature for Integrity: The signature ensures the token’s authenticity and integrity, preventing tampering and verifying the issuer.
- Not Encrypted by Default: JWTs are signed, not encrypted. Their content is readable by anyone who obtains the token. Sensitive data should not be placed in the payload without additional encryption (JWE).
- Security Considerations: Be mindful of XSS (token storage), CSRF (cookie-based tokens), weak secret keys, and the challenges of immediate token revocation.
- Use Cases: Ideal for RESTful APIs, microservices, and mobile applications where scalability and cross-platform compatibility are crucial.
Understanding these core concepts allows developers to leverage JWTs effectively while also being aware of their limitations and how to mitigate potential security risks.
References
- JSON Web Token Introduction - jwt.io
- JWT Authorization: How It Works & Implementation Guide - Frontegg
- JSON Web Token (JWT) Authentication - Tyk
- Step-by-step guide for implementing API Authentication with JSON Web Tokens (JWT) - Medium
- RFC 7519 - JSON Web Token (JWT)
Transparency Note
This document was created by an AI expert drawing upon the provided search context and general knowledge of JWT authentication. All efforts were made to ensure technical accuracy and adherence to the requested structure and constraints.